

Anamator™ Manual
Anamator is a programmable signal blender. It transforms a dual-loop switcher into a fluid, musical tool, where levels, routing, and filtering can evolve seamlessly over time or via expression.
Just hook up your favorite MIDI controller and let’s animate some analog devices!
Note: I’m continuously refining this manual to make it as clear and helpful as possible. Feel free to share any feedback through the contact page.
Features
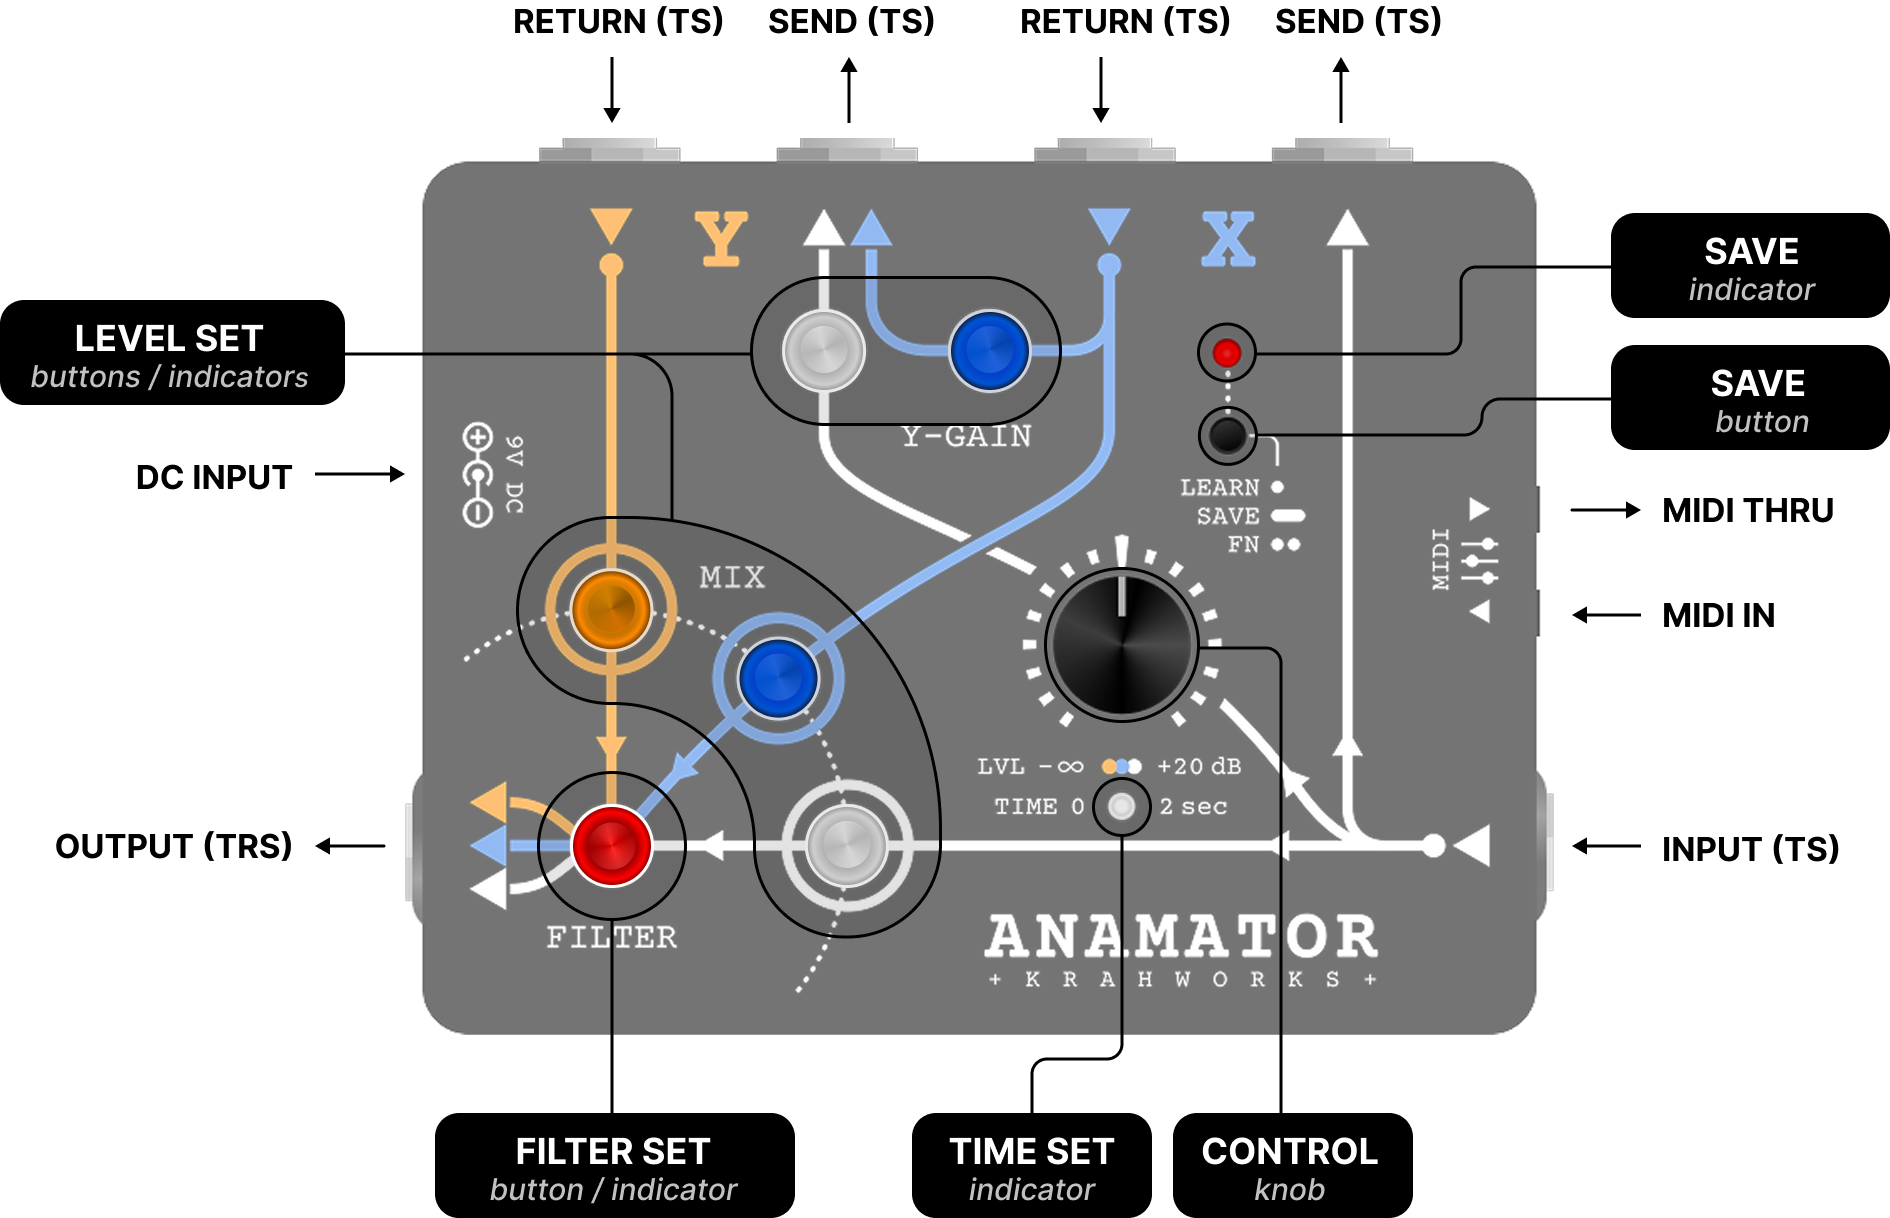
Control interface
- LEVEL SET (x5) – button/indicators
These are push buttons with light indicators showing the current settings of each level control. Push to activate the control for adjustment. Push again to exit. - FILTER SET – button/indicator
Like Level Set, but works counterclockwise with the Control Knob, as it reflects the cutoff frequency from the top down. - TIME SET – indicator
Indicates that the active control is Time (preset transition time). If nor Level or Filter Set button is active the Time Set is ON. Read more in Time Control - CONTROL KNOB
Sets the value of the active control (Time, Level or Filter)Control Min. Max. Time 0.0 sec. 2.0 sec. Level -100 dB +20 dB Filter (cut) 30 Hz 30 kHz - SAVE – button
Learn (single press), Save (long press – 3 sec.) and Function mode (double press) - SAVE – indicator
Lights up when ready to learn (waiting for a MIDI PC) or while saving. Turns off once the MIDI PC is received or a preset is saved with a long press.
Connectors
- INPUT, SEND and RETURNS – TS Jack connectors (mono)
- OUTPUT – TRS Jack connectors (optional stereo by internal switch)
- DC INPUT – 9V DC, center negative, 500mA supply recommended
- MIDI IN, MIDI THRU – 3.5mm Jack, MIDI Type A
Application example
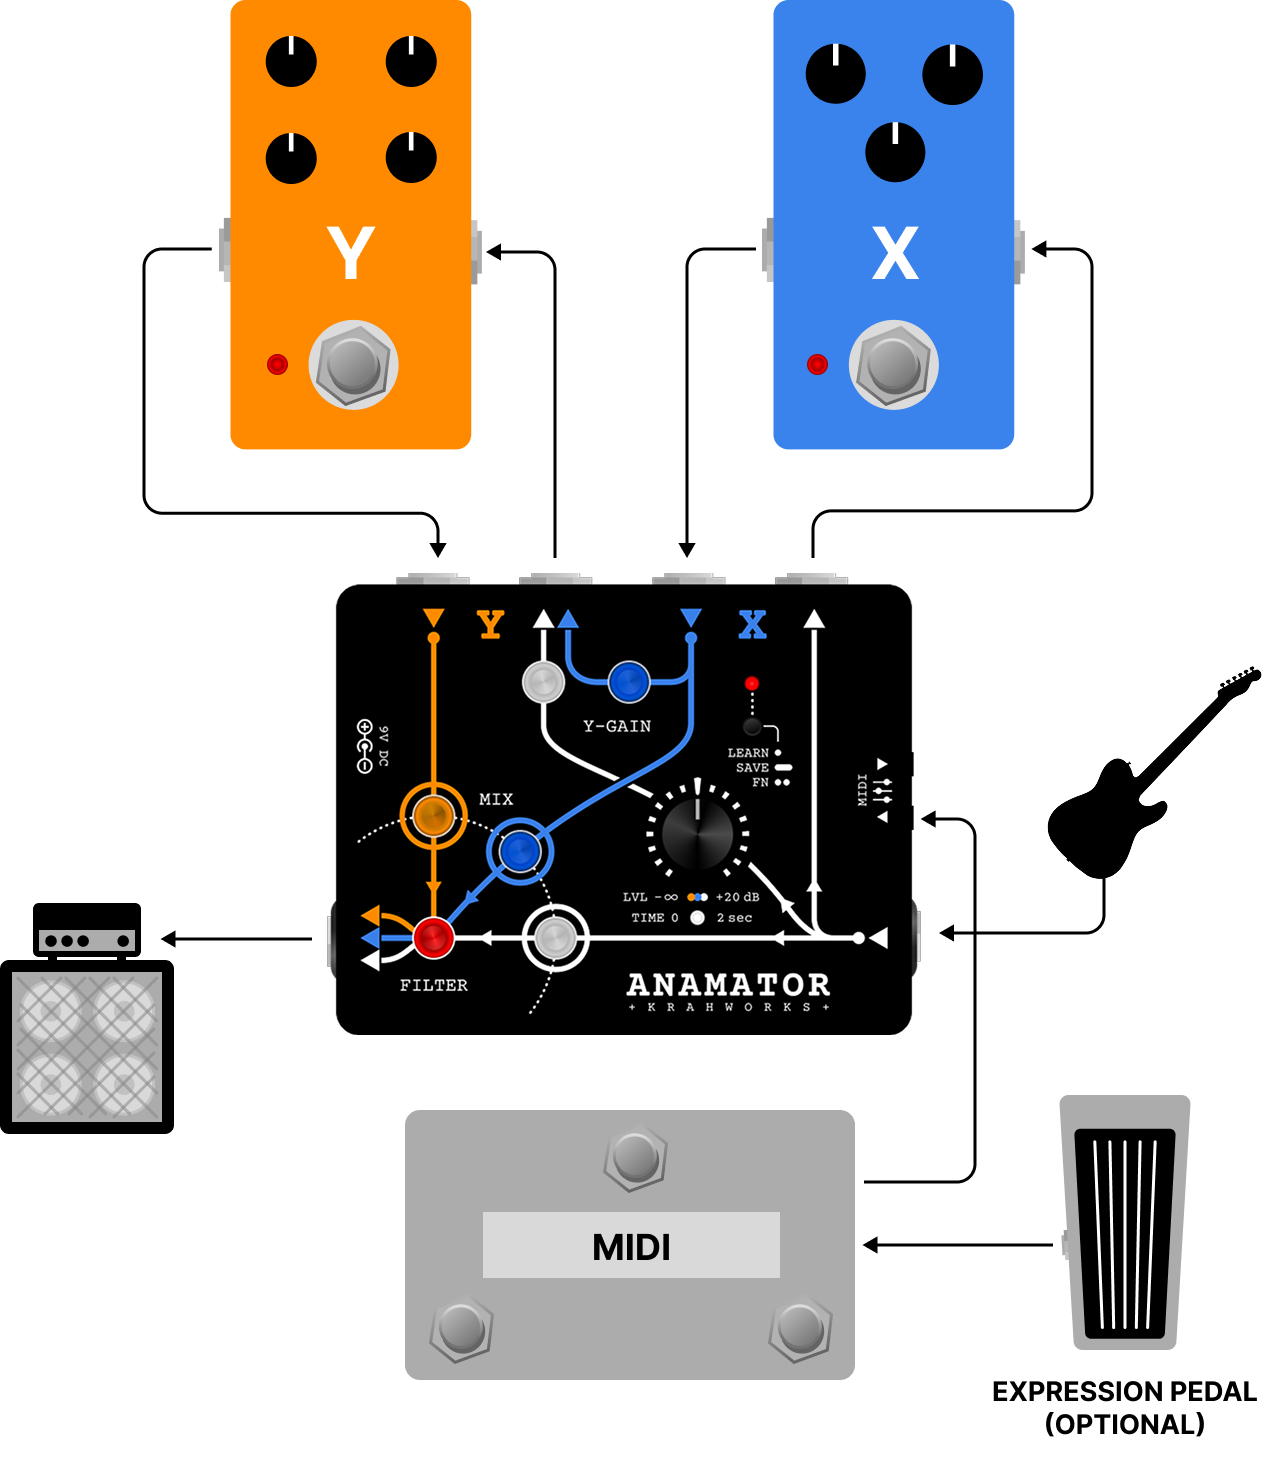
The Dirt Blender
Anamator is designed to give you greater control and a wider sound palette from your favorite dirt pedals. The idea is to build a defining tone with fewer drives, then adjust and expand it for versatility while preserving your personal sound.
There are many ways to order your drive pedals, and depending on their type and design, each combination will respond differently. How you connect them to the Anamator is entirely up to your personal preference.
X and Y can always run either fully in parallel or one at a time. The order matters only when X is routed into Y. Another factor to consider is that Y can be pre-boosted by up to 20 dB.
Common setups:
X:Fuzz -> Y:Overdrive
-Use the y-gain to make multiple tones from the overdrive and let it soften a harsh fuzz
X:Overdrive -> Y:Distortion
-Use overdrive to boost and alter the voice the distortion tones
X:Overdrive -> Y:Overdrive
-double overdrives can make really wide gain span, from mild to powerfull leads
Basically with this application you can create blends of X, Y and dry signal – in parallel and series. Then boost it for lead sounds. Hi-cut it for rounder sounds.
Routing
The level control mapping on Anamator is designed to enable seamless parallel and series blending of the three signals: Dry, X-loop, and Y-loop.
These illustrations show the signal paths when blending the X and Y loops in series and in parallel:
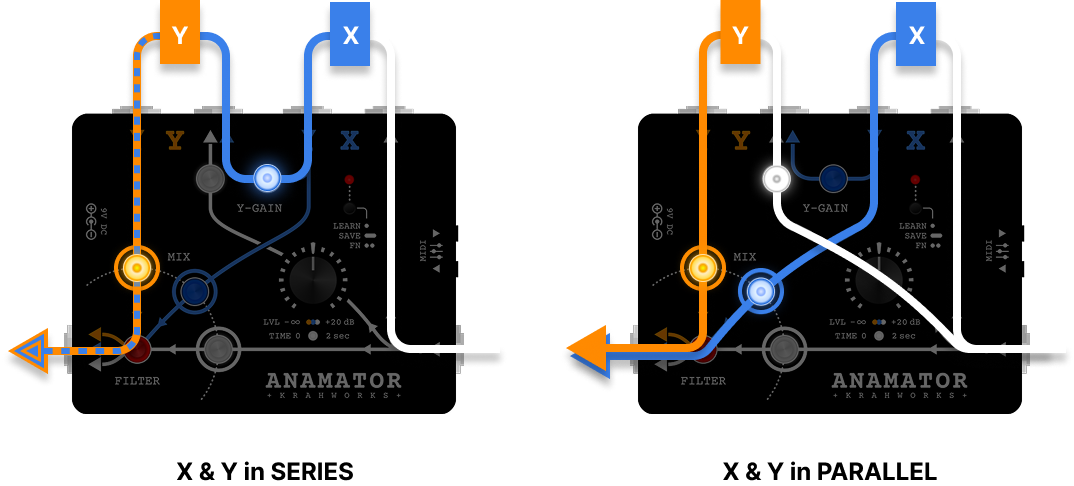
Y-Gain controls:
 Adjust how much DRY signal goes to loop Y
 Adjust how much from loop X goes into loop Y
Mix controls:
 Adjust how much DRY signal goes directly to your output
 Adjust how much from loop X goes to output
 Adjust how much from loop Y goes to output
Basic route examples:
| Y-GAIN | MIX | ||||
| Tone |
|
|
|
|
|
| Clean | |||||
| X | |||||
| Y | |||||
| X → Y(series) | |||||
| X & Y(parallel) | |||||
| Clean & X(parallel) | |||||
| Clean & Y(parallel) | |||||
Presets / MIDI PC
Anamator has 128 preset slots, mapped to MIDI PC 0-127. By factory default most slots have the same preset (clean signal at unity).
When you edit a preset you have the option to save it at its current location (save) or save it at a new location (learn).
Here are the steps to edit and save a mix preset:
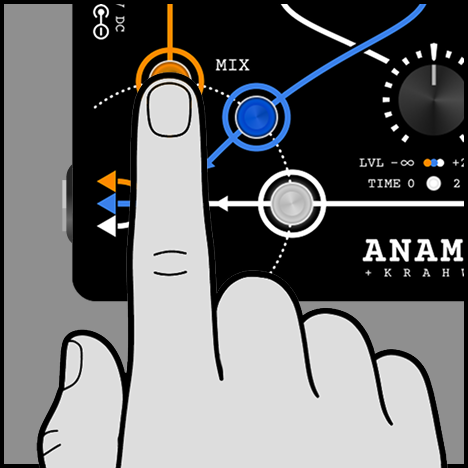
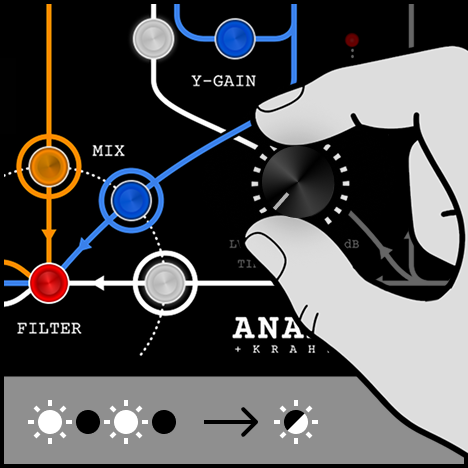
1CHOOSE CONTROL
Press any of the five LEVEL SET-buttons or the FILTER SET-button to select a control
NOTE: Exit edit mode by pressing the active SET-button.
NOTE: Animator will automatically exit edit mode if knob has not been touched for 30 seconds.
2SYNCHRONIZE KNOB
Turn knob to synchronize it with the current value of the selected control
Pressing a SET-button will likely make it blink. A blinking button indicates that the knob and the button’s value are not synchronized. While the button blinks, turning the knob will not alter the control’s value.
Simply adjust the knob, and the blinking will either speed up or slow down. Faster blinking indicates proximity to synchronization. Once synchronized, the blinking stops, allowing you to precisely discern the control’s setting and make adjustments.
NOTE: If a button doesn’t blink when pressed, it indicates that the knob and the control value already match.
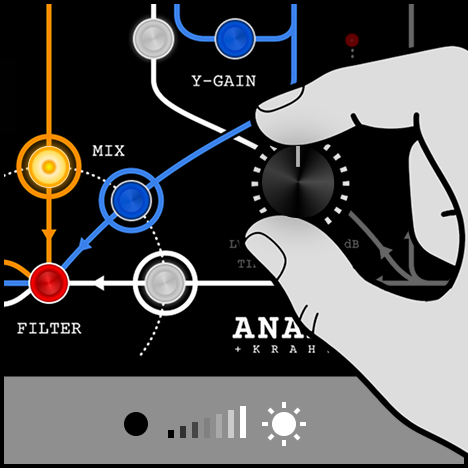
3SET VALUE
Set the value of the selected control.
For LEVEL SET – the louder the level the brighter the indicator.
For FILTER SET- the deeper the cut the brighter the indicator.
Now repeat STEP 1, 2, 3 to adjust all the parameters needed.
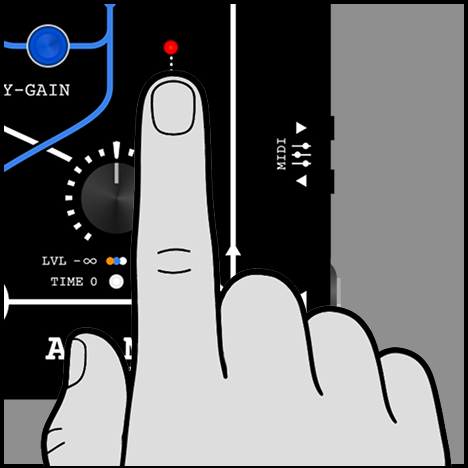
4ALEARN
SAVE the preset as a new MIDI program
Press the Learn/Save button once. The small red led light up while waiting for a MIDI PC message. When a PC message is received the current mix is saved onto the PC number and can be restored anytime the same PC number is received.
4BSAVE
SAVE the preset into the last loaded MIDI program
Press and hold the Learn/Save button for 3 second until the small led blinks twice.
Time Control
Anamator lets you transition smoothly between presets as each parameter fades from old to new position. The transition time can be set manually by knob or by MIDI Control Change.
Manual time
By default the duration of the transition is set by knob. The knob adjusts the manual time when neither Level or Filter buttons are active. Time indicator is ON.
Setting the knob all the way down you’ll have instant preset changes. From there, durations goes up to two seconds in a non-linear curve, where halfways is 500 miliseconds.
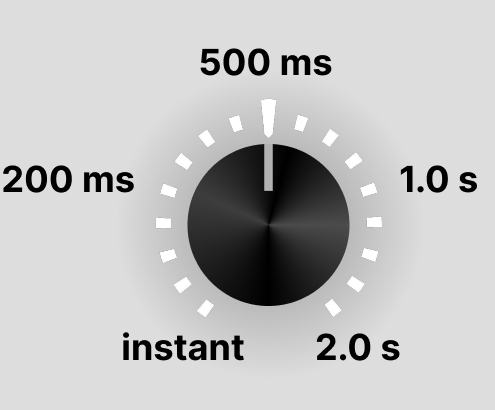
Manual time is volatile and works as a global setting. It is not saved into the presets.
Anamator does remember the last time setting when you edit presets. When returning from editing, the time indicator will blink until the knob is synced with the previous value.
MIDI time
Two types of midi time set are available: ONESHOT and GLOBAL.
If you need a specific transition time for a specific preset use the ONESHOT time feature.
Set the ONESHOT time (CC21) just before calling a preset change (MIDI PC). Time set will return to manual time right after, unless GLOBAL time is active.
The GLOBAL time feature (CC22) keeps the time value for all future preset changes, until reset.
Both midi CC function use the following scale:

The MIDI value range from 0 to 100 defines a linear time scale, with increments of 20 milliseconds per step (0–2000 ms total).
The MIDI value range from 101 to 127 defines a nonlinear time scale, smoothly extending the range up to 20 seconds.
IMPORTANT: Using very long fade times can make Anamator appear inactive when switching preset because the visible reaction also becomes very slow.
More on the MIDI CC Time set
TIME SET indicator states
OFF: Knob adjusts Level or Filter (editing preset).
ON (FULL): Knob adjusts manual time and fade durations are set by manual time.
ON (BLINKING): Fade durations are set by manual time, but knob is out of sync with current timeset, from before editing a preset.
DIMMED: Knob adjusts manual time, but fade durations are overridden by CC21 (ONESHOT) or CC22 (GLOBAL).
DIMMED (PULSATING): Knob adjusts manual time, but fade durations are controlled by expression.
Expression mode
Expression mode lets you fade preset by foot or any expression device connected to your midi controller.
Anamator does not have its own expression input instead it takes expression at MIDI CC (CC24)
Expression and preset changes
The expression feature depends on two presets. The previous (heel) and the current (toe).
In expression mode changing the preset sends the current preset to heel position and the new preset to toe position.
TIP: If you need to change both positions at once and your midi controller allows it – just send a double Program Change in one action.
Heel down before change triggers
In expression mode, fading into the new preset does NOT trigger until the pedal has been at heel down (value 0 is received). This way you can fade continuesly from one preset to the next without sudden changes.
If preset has changed but waiting for heel down the LEDs indicate a continues fade between the two presets, while audio is at heel preset still.
Edit presets in Expression Mode
Pressing an edit button lets you edit the preset closest to the current expression value (heel or toe). This is convenient if your expression presets are setup as double PC call. Then you can still access the heel-preset.
NOTE: The first time you engage expression mode and adjust the expression it might make a little animation glitch, as it has not received any value yet.. Just wiggle it and off you go!
Curves
All level and filter settings in Anamator use carefully shaped curves to make knob turning and preset transitions feel as natural and precise as possible.
Knob curves
Knob curves define how a physical knob position translates to level (dB) and filter (Hz) destinations.
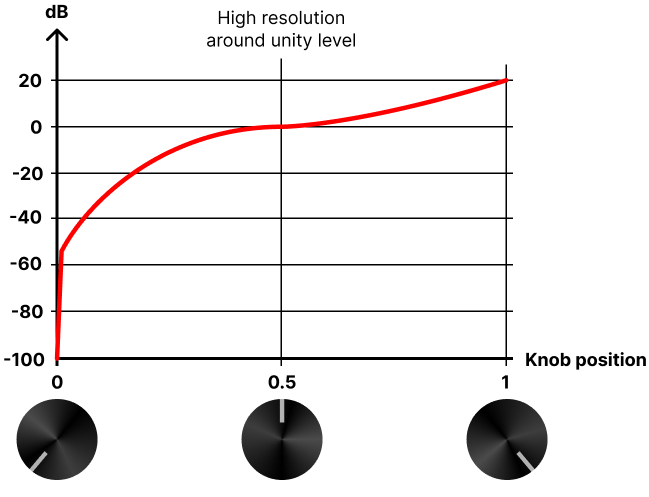
Level curve
The level curve gives finer control around the unity level (0dB), making it easier to dial in subtle balance changes while still allowing full cuts and boosts when needed.
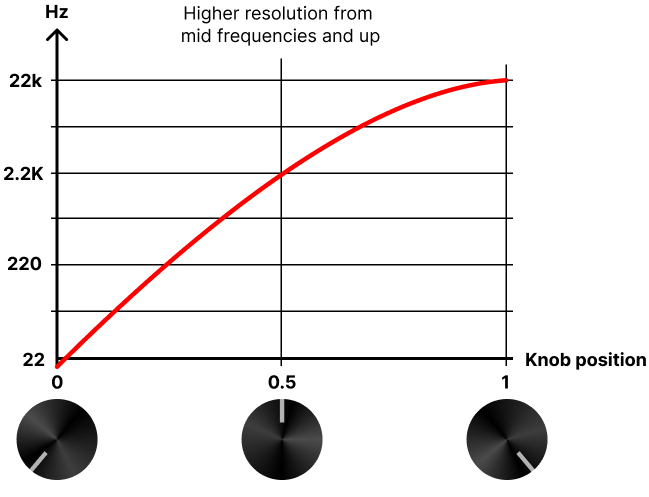
Filter curve
The filter curve is shaped to provide a little more resolution in the upper range, giving finer control over subtle cuts in the top end.
Fade curves
Fade curves define how Anamator moves from one preset value to the next during transitions.
Three curve variations are available:
The “moderate” curve is default, but can be changed using MIDI CC30.
Anamator handles parallel fades and crossfades a little differently:
Parallel fades: Linear style curves
Parallel fades are determined by all moving levels in a preset change are going in the same direction.
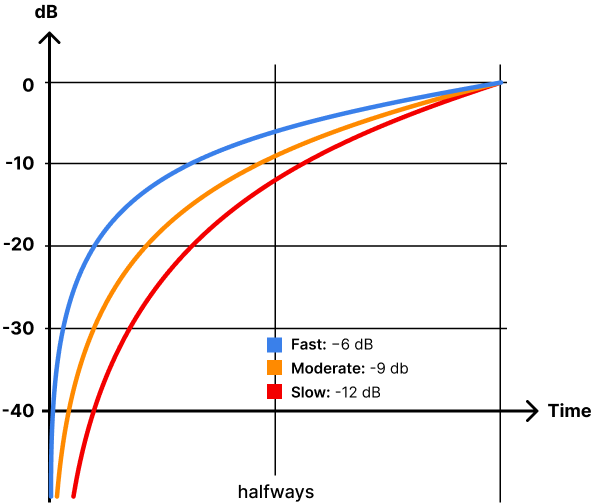
Figure: Fade from -100 dB to unity across the linear curve types (logarithmic dB scale).
Crossfades: Sine shaped curves
A crossfades means that at least two levels in a preset change are going in opposite directions.
Anamator uses a sine-shaped compensation to reduce the level drop that will occur at the midpoint of a crossfade.
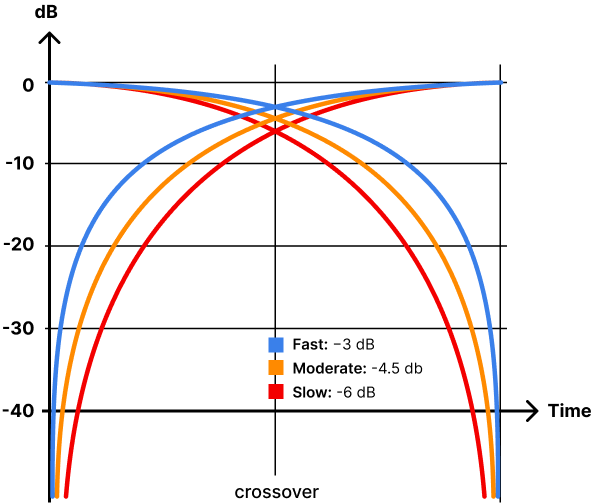
Figure: crossfading two values from -100 dB to unity and opposite, with each curve type
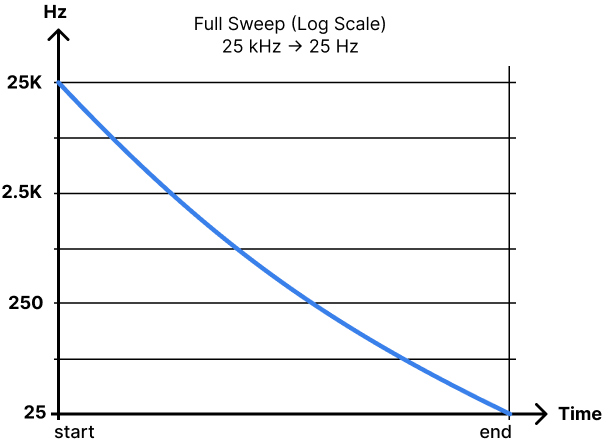
Filter fades
Filter fades are mapped across a logarithmic frequency scale, making the transition feel more perceptually linear to the ear. This results in smoother-sounding sweeps and more intuitive control when using an expression pedal.
MIDI CC
The Anamator responds to a small set of MIDI Control Change (CC) messages that let you shape how preset changes behave in real time.
| CC20 | Transition Mode | Value |
| Time mode (default) | 0-63 | |
| Toggle time/expression | 64 | |
| Expression mode | 65-127 | |
| Chooses how preset shifts are controlled. Default is “Time mode” | ||
| CC21 | Fade Time (One-Shot) | Value |
| Duration (0 -> 2s) | 0–100 | |
| Duration (2s -> 20s) | 101–127 | |
| Sets fade time for the next preset shift only, then reverts to knob or global if set. | ||
| CC22 | Fade Time (Global) | Value |
| Duration (0 -> 2s) | 0–100 | |
| Duration (2s -> 20s) | 101–127 | |
| Overrides knob for all future preset shifts until reset. | ||
| CC23 | Reset to Knob | Value |
| Time by knob value | Any | |
| Cancels global override (CC22) and returns to fade control by knob. | ||
| CC24 | Expression Fade | Value |
| Preset (old -> new) | 0-127 | |
| Manually controls position between old and new preset. Needs expression mode to be activated | ||
| CC30 | Curve speed | Value |
| Fast | 0-42 | |
| Moderate (default) | 43-85 | |
| Slow | 86-127 | |
| Fast is steeper at low end. Overrides default curve until reset or turned off. | ||
| CC31 | Reset curve | Value |
| Resets curve to default | Any | |
| Resets curve-type to default curve, which is MODERATE if not changed under Functions | ||
| CC40 | PC Forward (One-Shot) | Value |
| Immediately | 0–63 | |
| Post transition | 64–127 | |
| Tells PC messages to fire immediately or delayed until preset transition is finished. Overrides the default PC forward momentarily | ||
Functions FN
Anamator offers some on-the-fly features and settings available under the functions (FN) control.
Double-click the save button to enter FN-mode.
Now all LEVEL and FILTER buttons glow gently until you choose the setting you want to change.
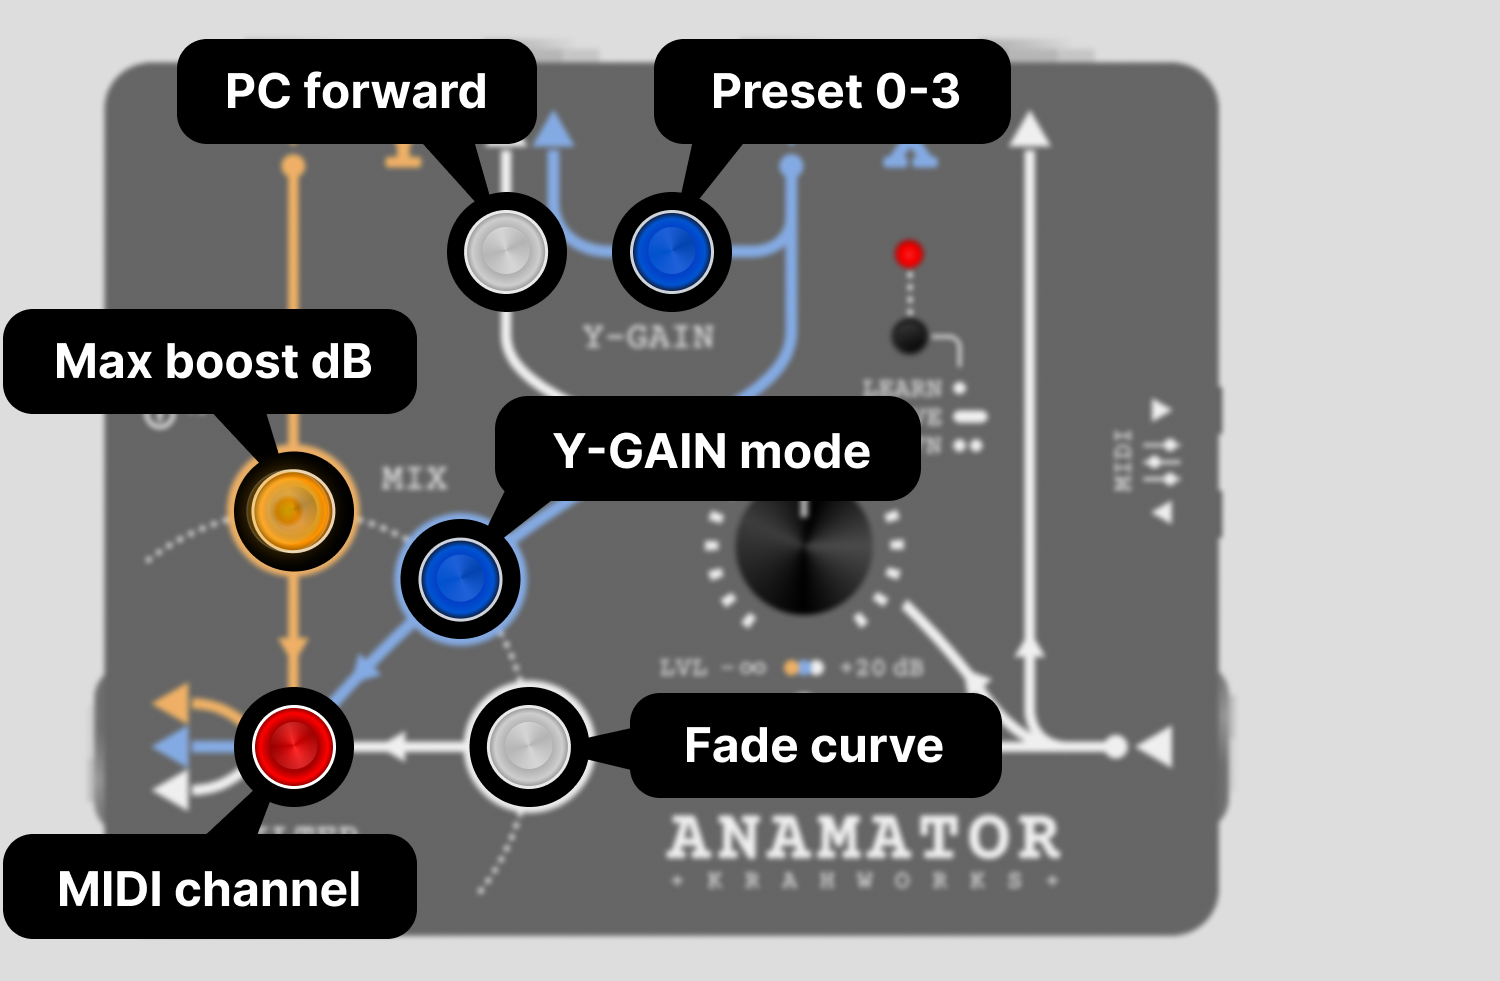
Preset cycle (0-3)
This make it possible to cycle preset 0 > 1 > 2 > 3 > 0 without a midi-controller.
The first preset loaded is always preset 0.
NOTE: You must double-click the save-button, to re-enter FN-mode, before each preset up command.
PC Forward
This toggles how MIDI PC messages by default are passed along through MIDI out.
The two options are:
Immediate THRU – PC messages are passed directly on, the same time as they are received.
Post Transition THRU – PC messages are delayed until the current preset transition has completed.
When the PC Forward button is pressed its LED will either:
- Blink promptly – Immediate THRU is engaged.
- Fade up and down – Post Transition THRU is engaged.
Typical use case:
Going from a distorted sound to a clean with reverb. The distorted signal could affect reverb to burst out shoutly if the reverb is turned on at the beginning of the transition. Delaying the PC Thru will let you animate your loops without other midi controlled effects interfearing.
NOTE: Delayed program changes will only occur for midi devices chained to the Anamators midi out port.
NOTE: CC messages are always passed on immediately.
MAX boost dB
This allows you to set the maximum boost level of the three MIX LEVELs to either: 20dB (default), 14dB or 8dB.
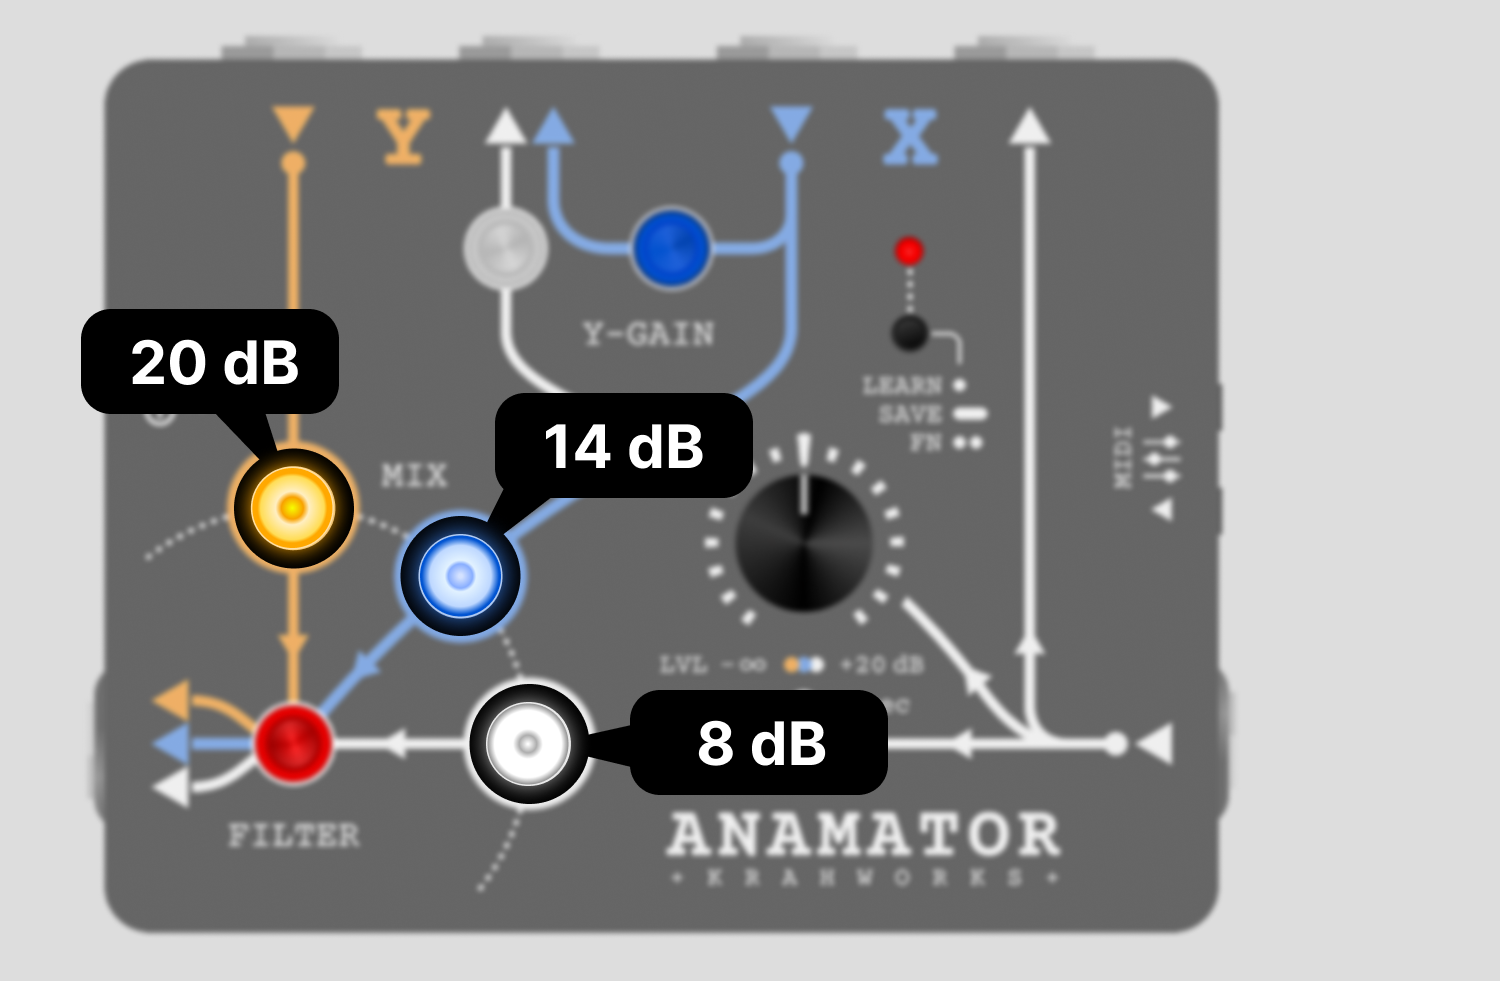
The three options now lights up and fades out in a sequence 20dB -> 14dB -> 8dB.
The sequence ends up double flashing the currently selected option.
Select the one of the the options, or cancel by pressing any other button on the Anamator.
Typical use cases:
- If setting up your presets to push a low-headroom amp to distortion. Then switching to a high-headroom amp makes all boosting presets too loud. – set a momentary maximum here.
- If 20dB is always too much and you want a better knob resolution to a maximum of maybe 14dB.
NOTE: The maximum dB only applies to Y-GAIN levels, when Y-GAIN mode is set to Amp-Out.
Y-GAIN mode
This toggles how fades and maximum boost of the two Y-GAIN levels behave.
Two settings are available: Loop-Send (default) and Amp-Out
When the button is pressed the two Y-GAIN LEDs will either:
- Blink promptly – Loop-Send is engaged.
- Fade up and down – Amp-Out is engaged.
| Behaviour \ Mode | Loop-Send | Amp-Out |
| Maximum boost | 20dB | Settings max (20dB, 14dB or 8dB) |
| Immediate gain* | Y-MIX dependant | Always fade |
| Curves types | Linear | Linear/Sine-shaped |
Loop-send is for using Y as an effect loop.
Maximum boost is always 20 dB, so that gain pedals can have the full amount of gain available.
Amp-out is for using Y as an output only. This could be for going into an amp, a DI or audio interface.
Maximum boost is is set by max dB settings (which defaults to 20, but can be lowered).
*Immediate gain
In Loop-Send mode (default), the two Y-GAIN levels are determined by changes in the Y-MIX (orange) values.
If a preset fade causes Y-MIX to start or end at -100 dB (off), the Y-SENDs will not fade. Instead, they switch directly to their target level at the beginning or end of the transition (depending on direction). This prevents double attenuation from both the send and return stages.
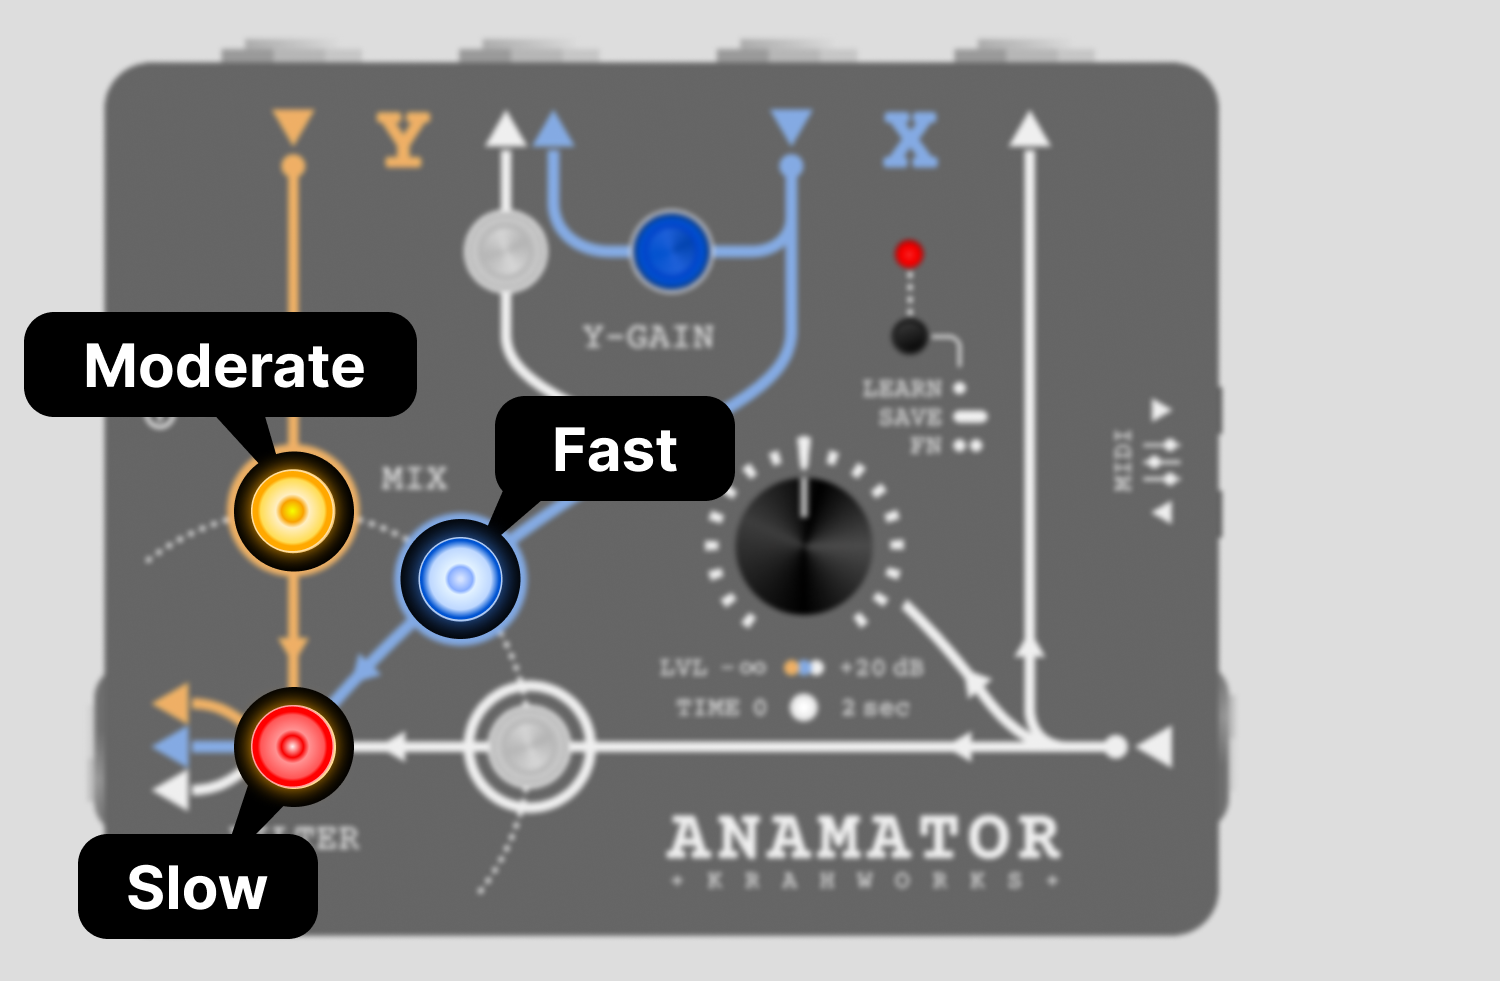
Default Fade curve
Select the curve speed you want as default. This can be overridden by MIDI CC30 for presets changes needing special curve speeds.
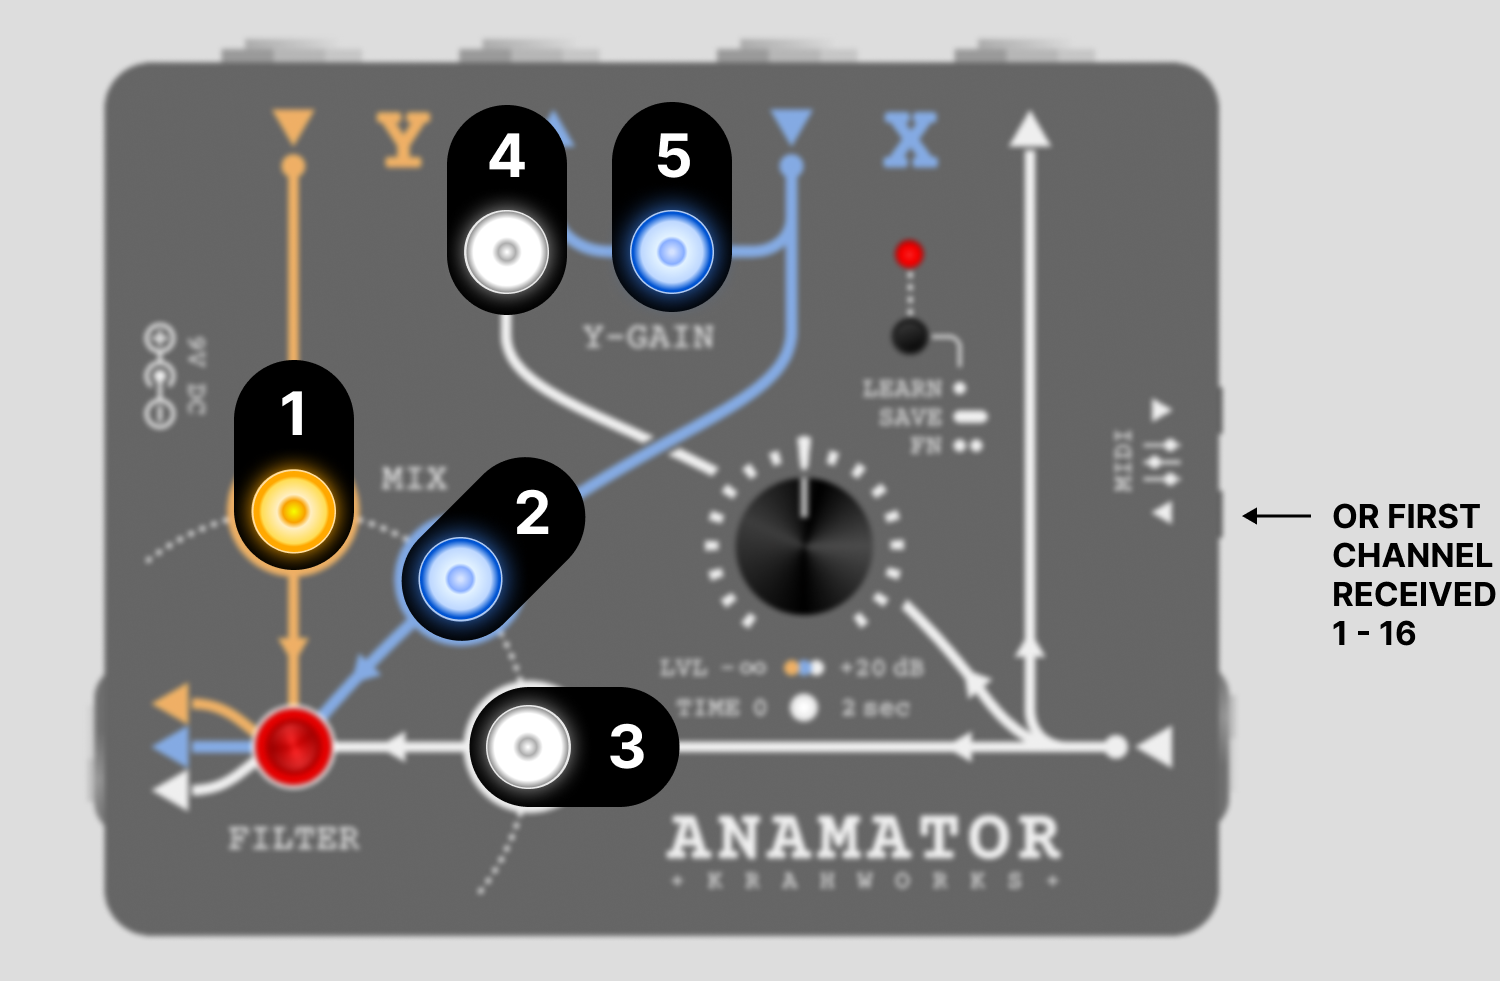
Set MIDI channel
Internal Setup
Loop output Impedance
Some dirt pedals sound better when the input is at a bit higher impedance. Especially classic germanium fuzzes.
Anamator has a separate impedance trimpot for each loop send.
The minimum and default impedance is 1K. When turning the trimpot clockwise the impedance increases up to a maximum of 50K
Loop return phase
Some pedals have an inverted output, meaning the voltage swing of the audio signal is opposite from input to output.
If two opposite signals are mixed in parallel, it causes phase illimination. The mixed signal becomes weak and thin.
Anamator has two internal phase invention switches – one for each loop return. These will flip back the phase of an inverting pedal and ensure your mixed signal stays full and strong.
X loop to seperate output
Finally there an internal switch that allows the X-loop to go out a seperate output. When engaged you must use a TRS-jack into the output socket. This way you can control two different amps with two different effects in front of them. Read more in Other Applications
Other Applications
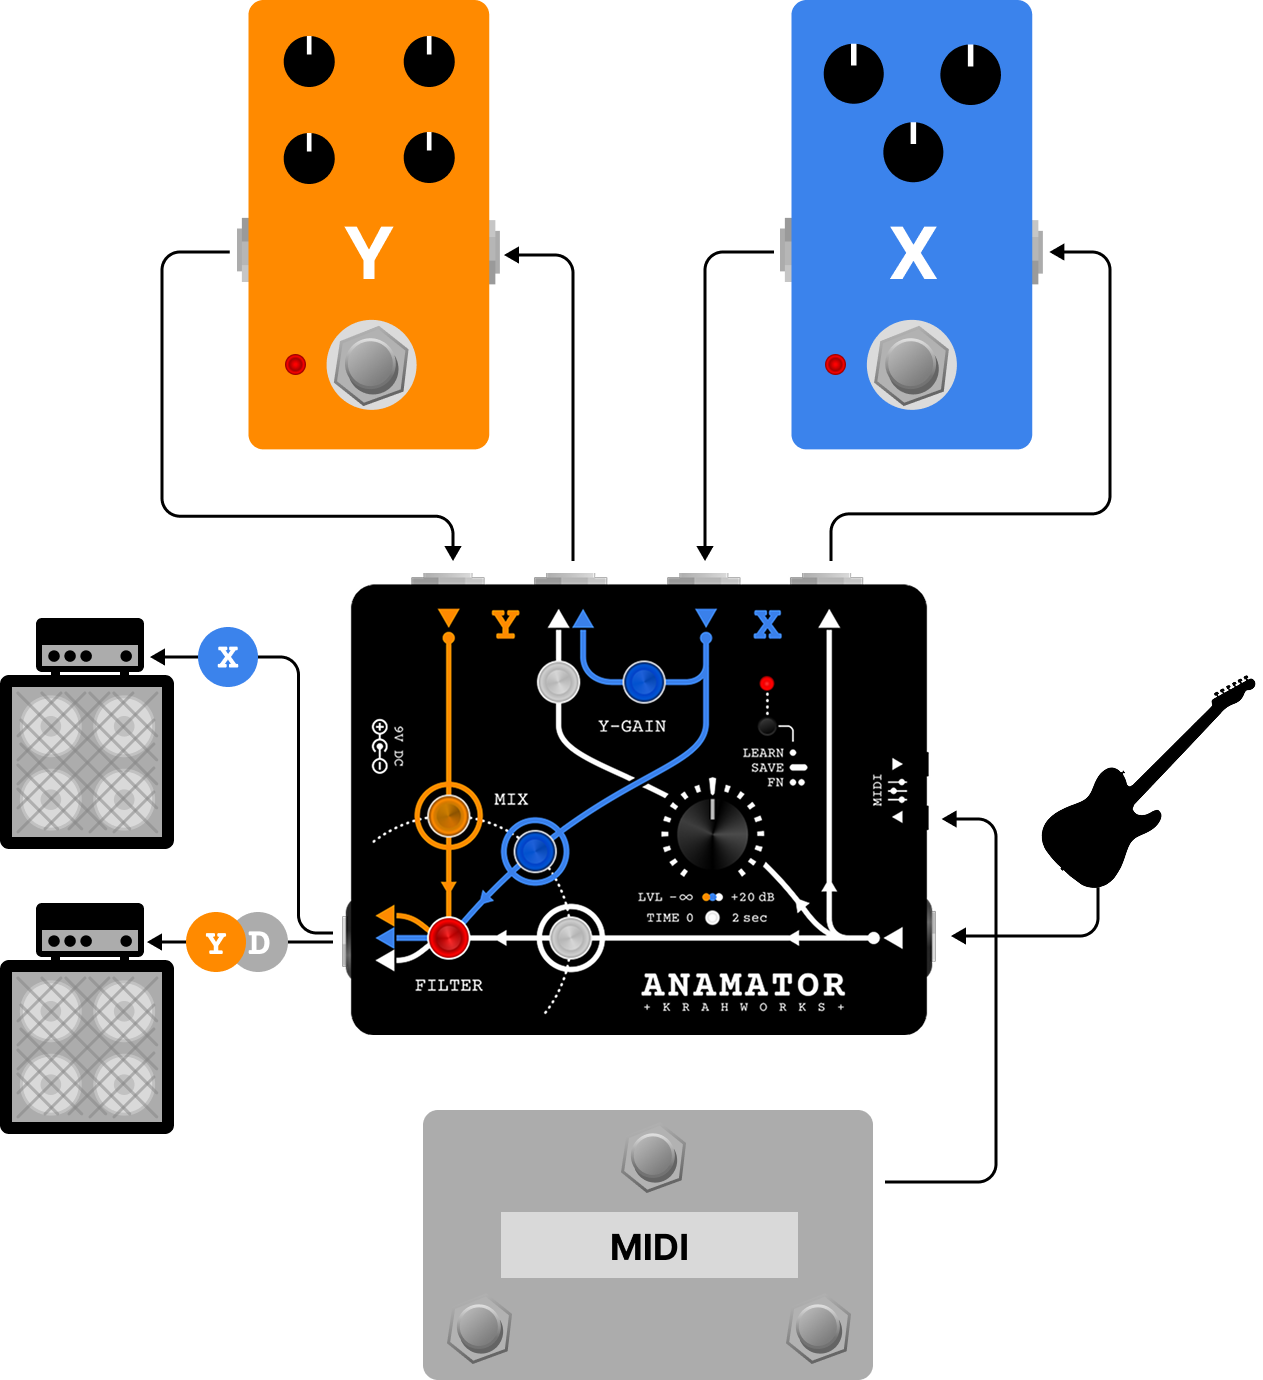
1. Separete X & Y outputs
Anamator has an internal switch to allow the x-loop to be send to the ring part of a TRS jack.
This feature lets you have seperate controlable outputs for either stereo sounds or engaging different amps for different sounds.
Maybe you want your lead tones out of a dedicated lead amp or maybe you want stereo sounds with the two dirt pedals out each amp. This is the way. Note: Clean signal and filtered mixes (of clean/y-loop) can only go through the Y-amp.
* an isolation box is reccomended to avoid ground loop noise.
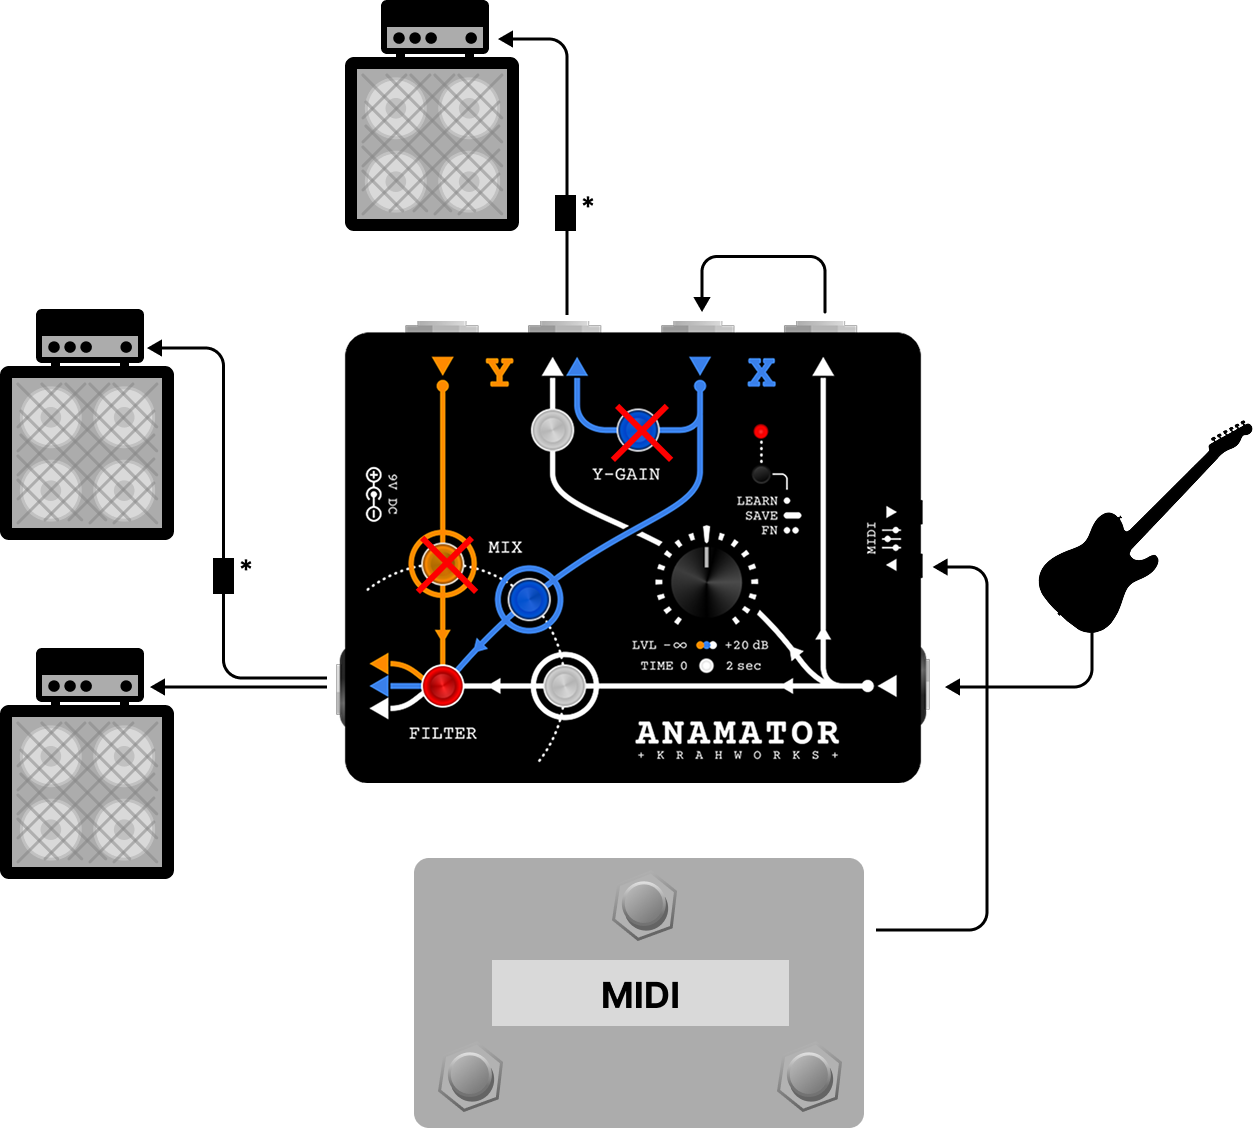
2. Trippled outputs
Anamator has three volume controllable outputs. If you need to shift between three amps or perhaps two amps and a DI-signal. It can be done this way. Plug a cable into the x-loop and set the x-loop to ring by the internal switch. You might also want to set the Y-GAIN mode to Amp-Out to have full control over fading the y-output (see Y-GAIN mode under Functions FN).
* an isolation box is reccomended on two channels to avoid ground loop noise.
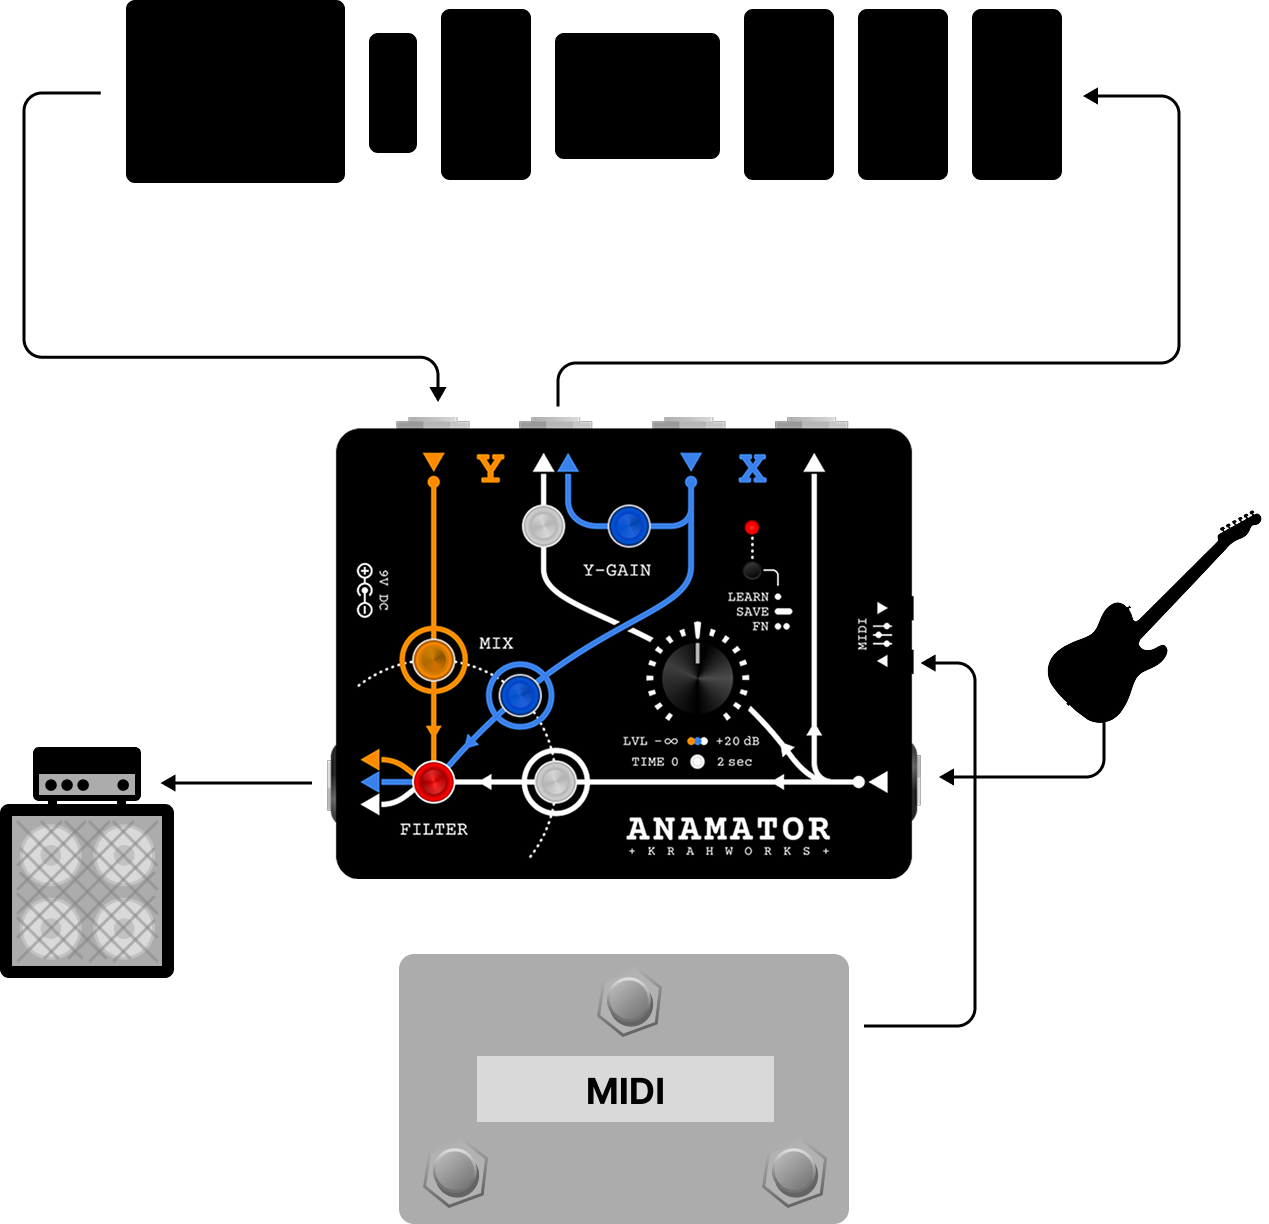
3. Master Volume in / out
Place your entire effect chain in the Anamator Y-loop to gain both pre- and post-master volume control.
This effectively gives you a boost stage at each end of your signal chain. Boosting before the chain sends a hotter signal into your effects, increasing saturation, while cutting the level cleans up the gain. A boost at the end raises the overall output -ideal for leads, while a cut can help balance out any excess volume caused by pre-boosting.
The X-loop remains free to use for a parallel effect or an additional effect chain.